Basic knowledge of mechanical part drawing, CNC precision machining parts, turning and milling parts.
Size classification:
1) Basic size: Use it and the upper and lower deviations to calculate the limit size.
2) Actual size: the size obtained by measurement.
3) Limit size: the two extremes allowed by a size, the largest one is called the maximum limit size; the smaller one is called the minimum limit size.
4) Size deviation:
The algebraic difference of the maximum limit size minus its basic size is called the upper deviation;
The algebraic difference of the minimum limit size minus its basic size is called the lower deviation.
The upper and lower deviations are collectively called the limit deviations, and the deviations can be positive or negative.
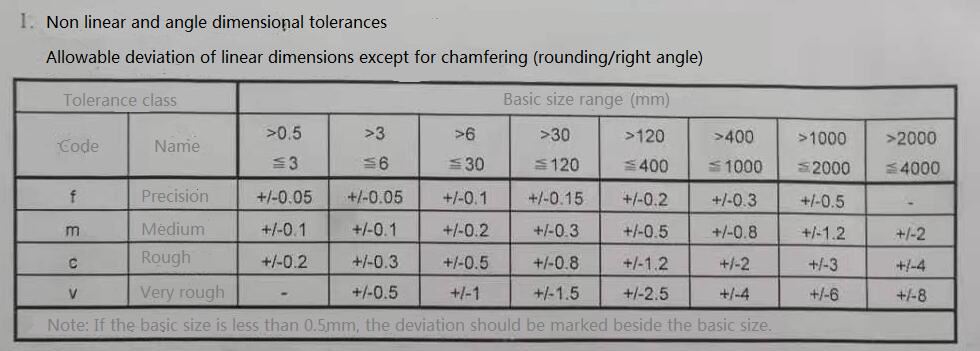
5) Dimensional tolerance: referred to as tolerance
The difference between the maximum limit size minus the minimum limit size is the allowable size variation.
The dimensional tolerance is always positive.
6) Zero line: In the limit and fit diagram, a straight line representing the basic size, and the deviation and tolerance are determined based on it.
7) Standard tolerance: any tolerance specified in the limit and fit system.
The Chinese national standard stipulates that for a certain basic size, the standard tolerance has a total of 20 tolerance levels.
Tolerance is divided into three series of standards: CT, IT, and JT.
CT series are casting tolerance standards,
IT is the ISO international dimensional tolerance,
JT is the dimensional tolerance of the Chinese Ministry of Machinery
Different products have different tolerance levels. The higher the grade, the higher the production technology requirements and the higher the cost.
8) Basic deviation: In the limit and fit system, determine the limit deviation of the tolerance zone relative to the position of the zero line, generally the deviation close to the zero line.
The Chinese national standard stipulates that the basic deviation code is expressed in Latin letters, uppercase letters indicate holes, and lowercase letters indicate shafts.
28 basic deviations are specified for each basic size segment of holes and shafts.

Yejia precision machining provide CNC turning parts machining service, welcome to contact Miss Janice:
E-mail: sales2@yejiavi.com


